When I created the database for your copy of Gratuity Insight, I include the default user name and password combination of admin / admin. Please change the password!
This is where you will input the information for your employees.
This is where you will create the rates that your employees will be paid at for their gratuities.
When I created the installer for your copy of Gratuity Insight, I included all of the connection information to connect to the Azure SQL database that Bell Desk Insight, Ticket Board and Gratuity Insight use. If you ever need to reenter this information, this window is where you will do it.
The passwords window is exactly the same for Bell Desk Insight, Ticket Board, and Gratuity Insight. The default user name and password is admin admin. You may use this combination to log in to the passwords window. User names and passwords can be created for individuals or for groups. The user levels will determine the level of access that each person or group will have. Each user name and password must be at least 6 characters, be unique, and include lower and upper case.

There must always be at least one user with a user level of 1. This guarantees that there will always be a user with complete access to the program, and all settings. I would use this level for department managers.
User level of 2 is the same as level 1, but there is no access to the database window. This can be used for supervisors.
This user level was designed to be used by lower level supervisors and bell captains. These users will be able to access all functions necvessary for the day to day operations of the bell desk, but will not be able to make changes to the program.
This level only provides access where the user will be able to enter fronts, and will be able to scan for fronts or to be placed into the queue. This was designed for bell persons.
User level 5 is restricted to using only the version of the Dashboard where the bell person will only be able to scan in their id to be placed into the queue, or to scan for fronts when available. Designed to be used by bell persons.
This is the most restrictive user level for use by bell persons. They will only be able to scan in for fronts, and to be placed into the queue.
This user level was designed to be used by front desk agents to enter fronts into the system. This is the only access they will have.
With a user level of 8, the user will have access to all configuration settings for the program, but not to the features for the day tom day operations. This level was designed to be used by IT and support staff.
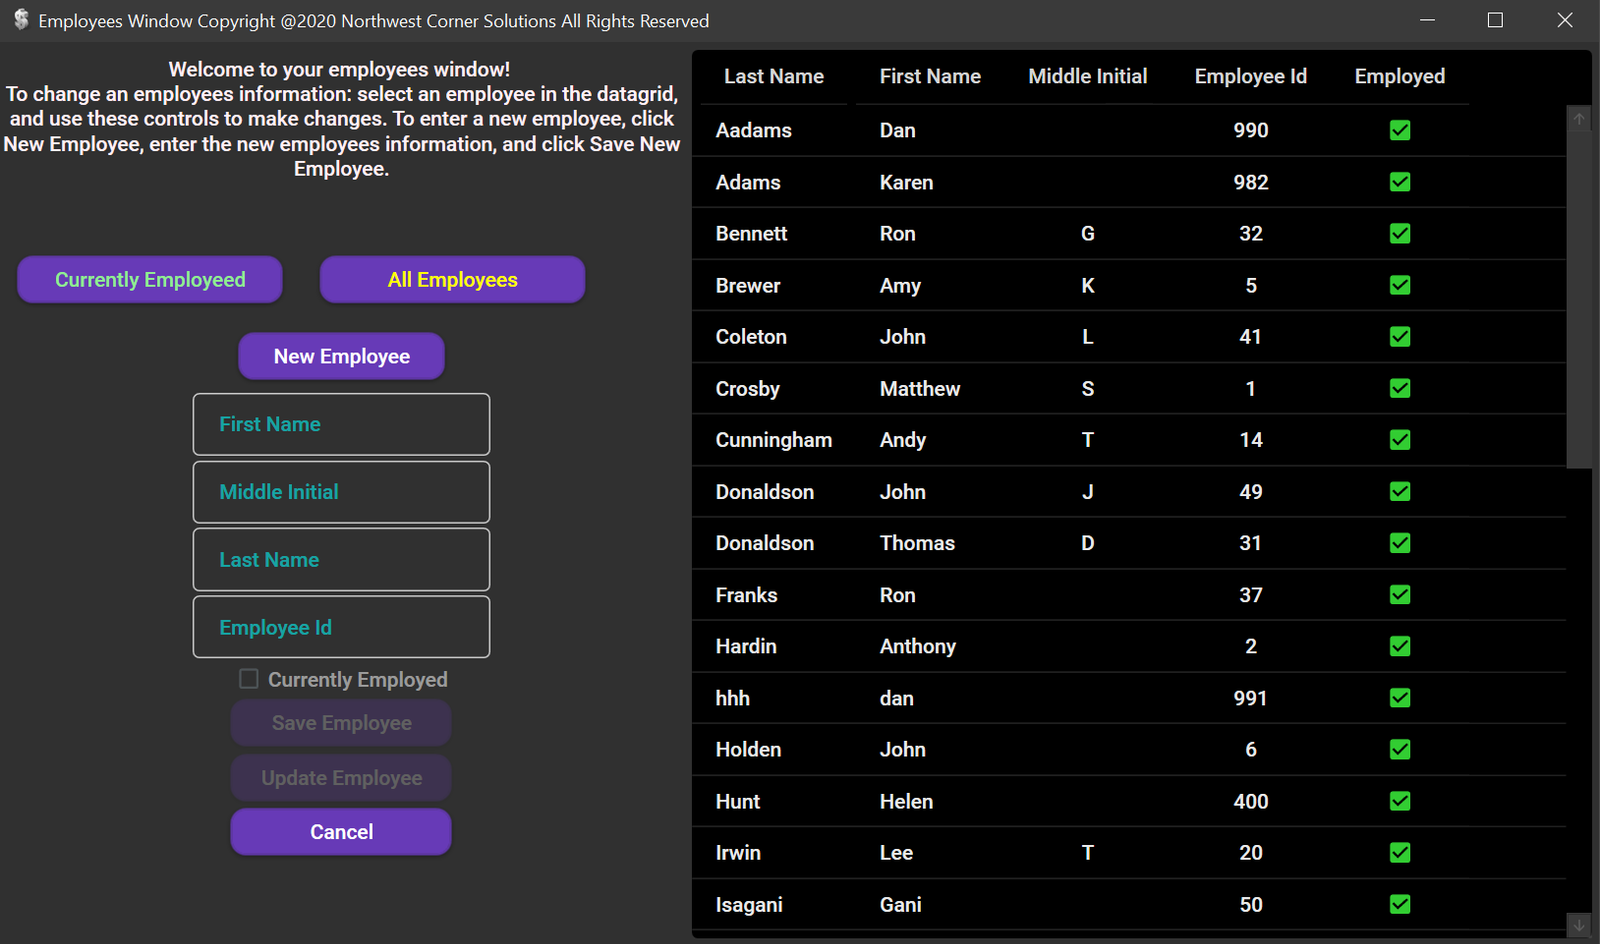
Again, this window is the same for all three programs. It is quite easy to add or make changes to your bell staff. To add a bell person, just click New Employee, enter the employees information, and save the employee. To make changes to an employee, select them in the data grid, make your changes, and update the employee. Employees cannot be deleted from the system. If an employee is terminated, simply uncheck Currently Employed.
There are two types of gratuities determined by the Big Group Gratuity check box. If this check box in not checked, the gratuity rate will be used on the Enter Gratuities and the Manage Gratuities windows to assign the gratuity to an employee. If it is checked, the gratuity rate will be used on the Enter Big Groups and the Assign Big Groups windows to assign employees to a group at the gratuity rate. Every time you assign a gratuity to an employee, either a single gratuity or as part of a group gratuity, these are the rates they will be paid at. You may enter new gratuity rates by clicking the New Gratuity Rate button. To delete a gratuity rate or to make changes to the gratuity rate, you must select it in the data grid. To create a new gratuity rate, you must enter a description of the gratuity, and enter a decimal amount for the rate. If this gratuity will be used as part of an assigned group with several employees sharing the gratuity please check the Big Group Gratuity check box. If this gratuity will be added to the employees totals or is usually added to the employees payroll, please check the check boxes.
If you have Bell Desk Insight installed, we have the ability to automatically save a gratuity when it is assigned to a bell person in the Bell Desk Insight program. For example, lets say that every time a bell person delivers dry cleaning to a guest, they are paid an automatic gratuity. Rather than assigning a bell person to deliver the dry cleaning with Bell Desk Insight, and then entering the gratuity in Gratuity Insight, you may link the dry cleaning gratuity to an activity in Bell Desk Insight here. Simply select the activity you want the bell person to be paid for in the combo box. Now, whenever a bell person is assigned dry cleaning in the Bell Desk Insight program, a gratuity is automatically saved for the bell person
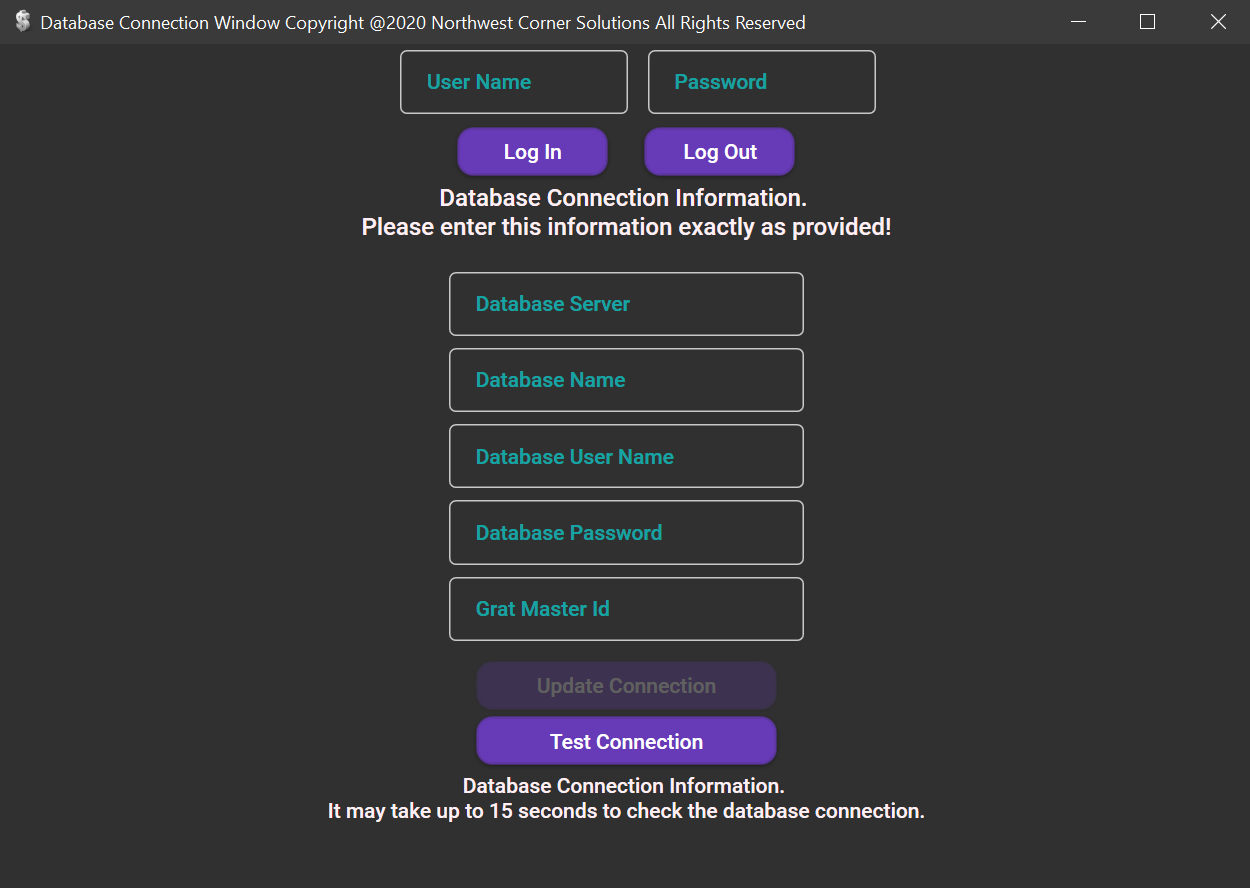
This window is used to update or reenter the information Gratuity Insight uses to connect to the Azure SQL database. When I created the installer for your copy of the Gratuity Insight program this information was included automatically as part of the installation process. If you ever need to reenter this information, please open the database credentials file I included with the installer program. It is easiest to simply copy and paste the information in the appropriate text boxes. Click the Test Database Connection button, and the program will attempt to connect to the database. If the connection is successful, just click Update Database Connection. This proceedure should not be necessary.
