Using Bell Desk Insight

Bell Desk Insight window

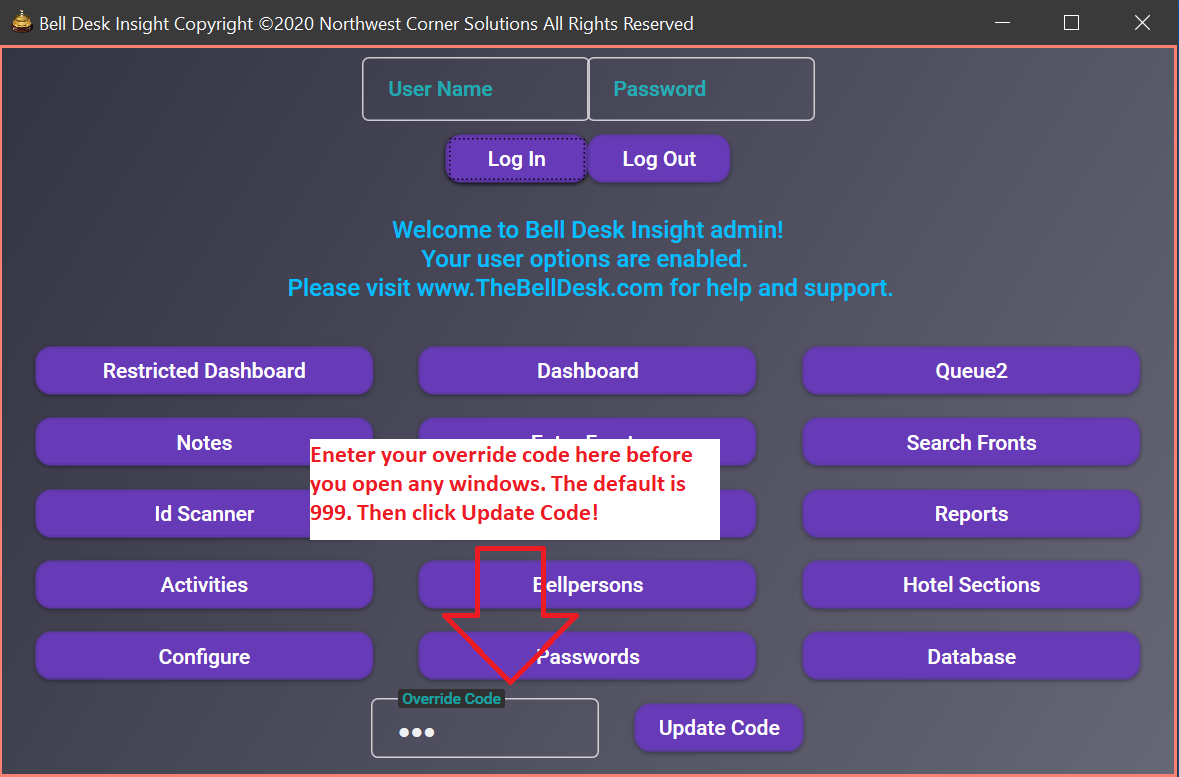
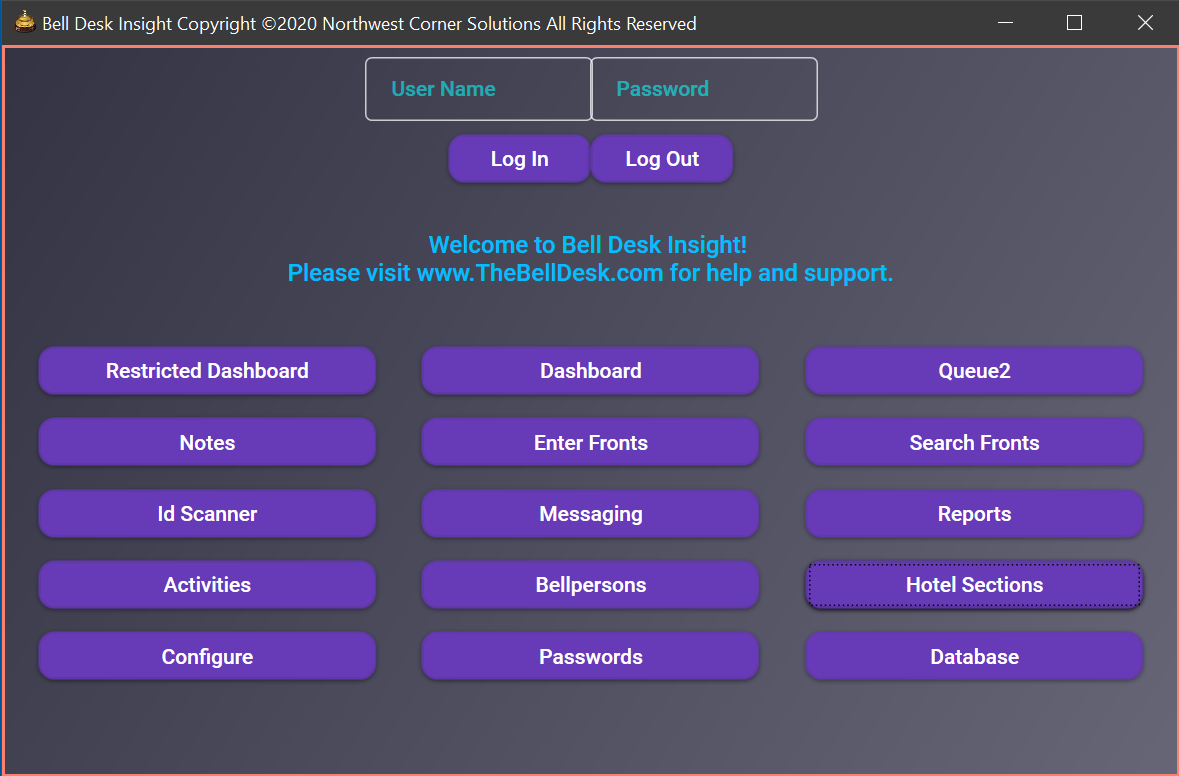
Log In to Bell Desk Insight

Where you first start Bell Desk Insight, this log in window will open. Enter your user name and your password and click Log In. If this is your first time using Bell Desk Insight, the default user name is admin and the default password is admin. The available windows will be determined by your user level. At the bottom of the log in window you will be able to change the override code used to assign fronts to a bell person out of order.

The Dashboard

This window is where you will spend most of your time. The Dashboard on the left is the unrestricted Dashboard, which is generally used by the bell captain or or the supervisors. You may enter, delete, or change fronts. You may also assign fronts and put bell persons into the top of the queue. The Dashboard on the right is the Dashboard that is used by the bell staff. They may only scan for fronts, and to be placed back into the queue. The fronts waiting data grid is hidden, so that the bell persons will have no idea what fronts are next. Using the configure window, you may specify exactly what the bell persons will have access to on their version of the Dashboard. I will go thru each part of the Dashboard window below.
Bell Desk Insight window

How to enter fronts

Lets start off with one of the most basic tasks you will do: entering fronts into the system. There are 2 ways to input fronts. You may use the dashboard window, or the enter fronts window. The process is the same for both. Simply enter the room or location for the front, enter or scan in the ticket number, enter or scan in the guest name or id, select the front type and the tier level. The tier level is the importance of the front. Fronts with a lower tier level will be assigned first. The hold front check box is used to put a front in, and not have it assigned. Click enter front, and the front is put into the fronts waiting data grid. The number of fronts available and the longest wait time will automatically refresh.


Bell Desk Insight window

How to change a bell persons activity

The second task you will be performing the most is simply changing a bell persons current activity. When a bell person is assigned a front os a last their activity is automatically changed to the front or last. When you need to change a bell persons activity, say you need to put the bell person back into the queue or on braek for example, you may simply right click the bell persons name in either the queue or the assignments data grids and select the new activity. If the bell person is not is either data grid select the bell persons name in the combo box and right click it there to bring up the activities menu. If you are using a scanner the bell person may put themselves back into the queue or get fronts by scanning in their id.


Bell Desk Insight window

The Dashboard Window, Left Side

In the top left of the Dashboard window, we have the area you will use to input, update, or delete fronts. If you check the hold front check box, the front will be placed into the fronts waiting data grid, but it will not be assigned. The Front Type combo box contains activities that are related to fronts. The activities that are listed here were created with the Show in Dashboard Window checked, and either the Assign to First Bellperson or the Assign to Last Bellperson checked. The Tier combo box determines the importance of the front. Fronts are assigned based upon their Tier level, 1's first, 4's last. Directly below this area, we have the fronts waiting datagrid. When fronts are entered, they will be shown in the datagrid. You may select fronts in this data grid to delete or to make changes. Directly below this data grid we have the assigned fronts data grid. This data grid shows you the last fronts that have been assigned. To assign a front to a bell person out of order, you may enter your override code in the box to the right. This will allow you to right click on a front is the fronts waiting data grid and bring up the list of bell persons to assign the front to.


Bell Desk Insight window

The Dashboard Window, Middle

In the center section of the dashboard we have a button labeled Assign Front. This button is used to manually assign the next available front to the next available bell person. Below this we have a check box labeled Auto assign fronts. When this check box is checked, fronts will be automatically assigned and printed. Directly below this we have an area for the bell persons to scan their id. This box is also used to enter the override code that is used to bring up the right click menues allowing you to assign fronts to a bell person, or to put a bell person back into the queue in their previous queue order. For example, This can be used for a Not in Room situation, where the bell person should be placed back into the queue at the top, or their previous position. Next, we have a Search Fronts button, which will open up the search fronts window. The Refresh butoon is used to reload the Dashboard with any changes made to the program. The Print Fronts check box will allow you to print fronts to you bell staff using the printer selected in the configure window. The Mute Voices check box will stop the program from announcing that fronts are avialable. Send Messages is used if you have the Bell Desk Insight App to alert bell persons that fronts are available, and to let them select fronts from their phones. The refresh interval selected determins how often this installation of Bell Desk Insight will access the Azure SQL database for updates. This refresh interval is set in the configure window. Please use the Slow mode interval where you are just monitoring the bell desk. The Fast interval will refresh the Dashboard quite frequently, which may annoy your IT department if it is used on too many installations of Bell Desk Insight.


The Dashboard Window, Right Side

The right hand side of the Dashboard window has an area at the top, which will light up and announce that a front is available for a bell person, and how long they have to get their front before they are removed from the queue. Below that we have a combo box that lists your bell staff. By selecting a bell person in this box, you may right click to bring up a list of activities that you may assign to the bell person. These activities are created with the attribute of Show in Dashboard Window checked, and the two Assign Front checkboxes are not checked. If you enter your override code into the box used to scan in ids, you can bring up the option to return the bell person to the queue in their previous queue order. The date grid below the bellpersons combobox is the queue order data grid. The person in the queue the longest is at the top, the newest at the bottom. The top bell person is the front, the bottom bell person is the last for the purposes of assigning fronts. Finally, we have the assignments data grid. This data grid shows you what every working bell person is doing at the moment.

Bell Desk Insight window

Right click override code

Right Click Menus

I have included several right click shortcut menus to make Bell Desk Insight faster and easier to use. A couple of these menues will require you to use the override code that you entered on the log in window. The right click menu for the fronts waiting data grid is used to assign a front to a bell person out of order. The right click menu for the assigned front data grid is used to reprint assigned fronts, or to make a front as being Not In Room. The menus for the queue and assignments data grids are used to change the current activity for a bell person.


Right click menu

Fronts Waiting Right Click

If you need to assign a front to a bell person who is not next for a front, simply enter your override code into the box used to scan in ids. You may now select a front in the fronts waiting data grid by left clicking it, and the right clicking. This will bring up a list of all bell persons that you may assign the selected front to. This is useful if you have a guest who requests a certain bell person. If you want to assign a front this way, it is best to check the Hold Front check box when you enter the front, so that the front will not be assigned to another bell person accidentally.

Right click menu

Assigned Fronts Right Click

You may select a front that has been assigned to bellperson in the assigned fronts data grid to bring up the options to reprint the front or to reenter the front as being Not In Room. The Not In Room option must be used before the bellperson is assigned another front or is put back into the queue. Usint Not In Room will put the front back into the fronts waiting datagrid with the hold option checked, and the guest name field will state that the front was Not In Room and the time will be noted.

Right click menu

Queue Right Click

To change a bell persons current activity, you may select a bell person in the bellpersons combo box, the queue datagrid or the assignments data grid and right click the bell persons name. This will bring up a menu of available activities for the bell person. If you want to put a bell person back into the queue in their previous queue order, like after a not in room, you must use your override code to have the menu option to return the bell person to the queue in their previous order.

Adding your Bell Staff


Bell Desk Insight bellstaff window

It is quite easy to add or make changes to your bell staff using the Bellpersons window. To open this window click the Bellpersons button on the log in window. To add a bell person, just click New Employee, enter the employees information, and save the employee. To make changes to an employee, select them in the data grid, make your changes, and update the employee. Bell persons cannot be deleted from the system. If a bell person is terminated, simply uncheck Currently Employed. The Is Assigned Fronts check box will allow you to assign fronts to this bell person. The Checks Luggage check box is used for the Queue2 window.


Activities

To open the Activities window click the Activities button on the log in window. Activities are simply any thing that your bell staff will be doing throughout their day. Every time a bell person is assigned to an activity, a record is created containing the bell person, the activity, and the start and end times for the activity. The first three activites are already created, and cannot be deleted. This way, we are able to keep track of each bell person, and can surface key operational metrics that would otherwise remain hidden. When you ctreate your activities, there are 8 attributes that determine what happens when the bell person is assigned the activity:

Bell Desk Insight database window
Show Bellperson in Queue

When an activity has this attribute checked, the bell person will be placed at the bottom the queue datagrids on the main Dashboard and the Queue2 windows.

Show Bellperson in Assignment List

This activity will place the bell person into the assignment datagrids on the main Dashboard and Queue2 windows if they are checked.

Show in Dashboard Wiondow

When used, this attribute will cause the bellperson to be placed into the Dashboard datagrids.

Show in Queue 2 Window

Similar to the previous attribute, but now the bell person will be placed into the datagrids on the Queue2 window. You may use both of these together, or seperately.

Assign Front to First Bellperson in Queue

This attribute will cause this activity to automatically be assigned to the first bell person in the queue.

Assign Front to Last Bellperson in Queue

This attribute will cause this activity to automatically be assigned to the last bell person in the queue.

Pass Over and Keep in Queue

Any activity with this atribute checked will cause the bell person to remain in the queue for fronts, but they will not be assigned a fronts when they are up. They will not lose their place in the queue, when the activity is completed they will be assigned fronts based on their order in the queue.

End of Shift, Complete all Activities

This attribute will cause the activity to put in any end times for any activities the bell person is assigned to, and will remove them from any queue or assignment data grids the bell person is in.


Configure Bell Desk Insight

Bell Desk Insight configure window

This window is where you will set the various options for the Bell Desk Insight program. The first two options dictate how long before a bell person is removed from the queue when they have a front. You may add minutes if it is a last man job so that the bell person cannot wait til there are removed from the queue and another bell person is assigned the last man job. The refresh intervals dictate how often each installation of Bell Desk Insight will check the Azure database for updates. If you are using the Queue2 window, it can be run independatly from the main queue on the Dashboard window by unchecking the queue2 checkbox. The second set of options dictates what access the bell persons will have on their copy of Bell Desk Insight. Bell Desk Insight is designed so that there can be a seperate copy installed where the bell persons are stationed. Their copy of the Dashboard should be restricted to prevent mischief.


Hotel Sections

Bell Desk Insight hotel sections window

This window is where you will specify the different sections of your hotel. This is done for two purposes. The main reason is so that the Bell Desk Insight program can assign bell persons additional fronts that are in the same section of the hotel. Secondarily, it is used so that fronts in the same section of the hotel are color coded in the Dashboard window. To start, enter a section number, and select the color for fronts in that section of the hotel. Next, select the section you just created, enter the lowest and highest room numbers in that section, and save.